Table Of Content

“This is probably one of the more important things if you actually want the bat house to work,” says Mizejewski. “Mounting is what people often get wrong, and then the box does not work.” In order to move in, bats need to feel that the box is warm enough, close to water, and safe from predators. Lay the back panel down flat with the textured and grooved side facing up. Place the rails onto the face, aligned with each edge and with about 2 inches between the top of the panel and the start of each rail. Glue the rails in place and further secure them with 1-inch brad nails.
'Bat boxes' could help revive Canada's depleting bat population - The Conversation Indonesia
'Bat boxes' could help revive Canada's depleting bat population.
Posted: Sun, 25 Jul 2021 07:00:00 GMT [source]
Growing Anise: The Beginner’s Guide to Planting and Caring for Anise
I will show you how to use these tools to cut and machine the bat house parts without having to muscle huge pieces of plywood around on a table saw. The bat house plan we’re using offers a perfect opportunity to work with youth or large groups. All the parts can be pre-made into a basic kit that’s fun to assemble. It’s a great way to do something positive for the environment (bats are great) and introduce kids to woodworking. Since you will need to make grooves in the wood, for the bats to hang from, be sure the back of the bat house is constructed from solid piece(s).
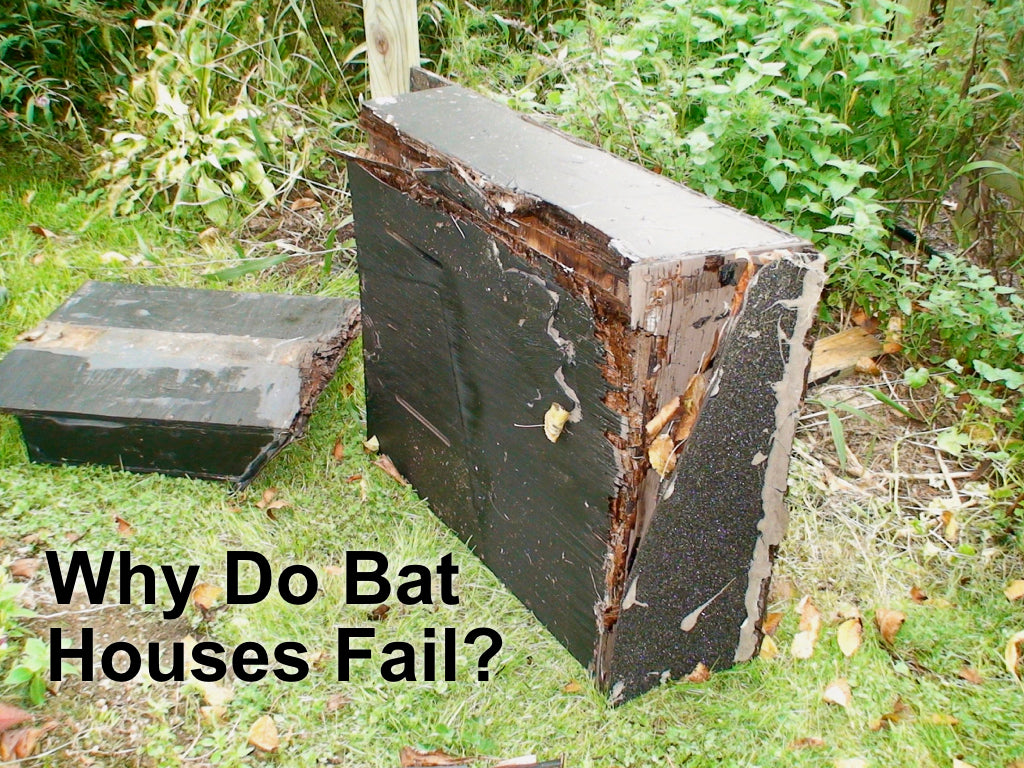
Single Chamber Mounted Bat House
The glamorous touches continue in the ensuite bath, where Sabatella added a custom mirror-tiled tub that plays off the vintage French tile floor. Opulence is on full display in David Levine’s dining room. “I really feel like the dining room is a forgotten room,” says the designer, who set out to prove how vital the space is to a home. The room is anchored by a Riva 1920 table made with the wood of a 50,000-year-old Kauri tree, which Levine surrounded with seating for 12.
Bat House DIY Plans
They have a wealth of information about bats and bat houses. Square the front and back panels, then cut grooves. Once these two panels are dry according to the glue manufacturer’s instructions, trim both ends of one panel, squaring them to its edges. The easiest tool for this is a crosscut sled on your table saw. Once the ends are square, leave the panel on the sled to cut graspable grooves. Set the blade height between 1/16 and ⅛ inch, and cut grooves every quarter-inch or so.
If the bat house is drafty, that’s going to make it less attractive.” Fill in all of those gaps between the panels and the rails with exterior-rated painter’s caulk. If you’re planning to stain your box, which you can do if you live in a warmer climate than I do in New England, you might want to use stainable wood filler instead of caulk. Keep bats out of your house and give them a place of their own. Rockler’s simple and effective bat house design is meant for mounting on a pole or the side of a building. This easy bat house plan is a great family project.
Cut a piece of nylon mesh the size of the inside of your box and, using a stapler, secure it into place. Make sure it is stretched nicely and flat against the back. It also provides additional information when it comes to bats, heavily advocating towards conservation and even the proliferation of their numbers. Attach the front to the sides with glue and screws to finish the box. Apply a bead of glue on the face of the spacers and the roof support. With the set of three back boards side by side, it is now time to hold them together.
This is the easiest step of all as you only have to line up the logo onto the box. Again, using your silicone, lay a bead along the top and side pieces where they meet the front. Before doing so, it's a good idea to see how far the front board sits as you don't want to apply silicone down any farther than necessary.
Materials
Cut grooves into both sides of the 18-inch boards for the middle panel. The bats most likely to roost in a box are used to spending time in trees, says David Mizejewski, a naturalist at the nonprofit National Wildlife Federation. This means the box should be textured like a tree to give the animals something to hold on to. Shallow grooves spaced between ¼- and ½-inch apart work nicely, according to Bat Conservation International.
What should I pay attention to when building my bat house?
Believe it or not, building a pup catcher can actually save the lives of baby bats. Oftentimes, bat colonies become overheated and overcrowded, especially during the summer months, and baby bats fall out of their houses, unable to get back in. These pup catchers give them an assist and allow them to crawl back up to their mothers. So, maybe you’re someone who prefers all things modern when it comes to the exterior of your home and when building your own bat house, you aim to continue that trend.
If you have any small business around you or even a business that gets a lot of freight delivered, then you can probably go and collect pallets from them. If they’re not living inside your house, bats can be beneficial for you and your garden. You see, there’s a reason why bats are natural pest control; they eat bugs. And no, bats in the US (and other big countries) don’t eat fruits.
Santicola and Monique Wood installed Caesarstone countertops fabricated by Carlito’s Way Stone to create a functional space for outdoor entertaining. Jerome Thiebault created a polished and petite bathroom complete with storage and a shower. Troweled cement plaster was applied to the walls, and handcrafted Zia tile adds pattern to the floor. Designer Lara Hovanessian packed plenty of bold design elements into the powder room and adjacent lounge. A moody House of Hackney floral wall covering lines the dressing area, which leads to a powder room accented with a Kelly Wearstler’s Graffito II from Walnut Wallpaper. A black-and-white triangular mosaic tile floor by Artistic Tile from Mission Tile West puts a contemporary twist on the classic checkered pattern.
Their website provides instructions on how one can properly construct a four chamber bat nursery even if the whole process of making it has numerous details. Her use of pictures in showing how she made the bat house is also helpful. Reclaimed pallets are the seemingly never-ending source of wood projects. Just be careful that you are sure to remove all of the nails before you get started. Also, only use pallets that have been heat-treated and not chemically treated. The bat house is all set and waiting for its new tenants.
The 1X2 inch pieces form the sides of the bat house and then there are two smaller pieces of plywood on top. Designers Frank Slesinski and Serena Brosio collaborated on the charming living room in the Gatehouse. “One of the main things we did was add a window seat, which looks like it should always have been here,” Slesinski says.
Be sure to drop each piece down from the top (about 1″), leaving just enough space to attach your top cap which prevents water from getting in. Plywood can also be used, although it may be better for other homestead projects. One measurement that is perhaps more important than either size or shape is the space that the bats will roost in. Before jointing wood, always cut the boards down to rough length. This makes flattening easier, and cuts down on the amount of material you’ll need to remove from warped boards.
Sad to say, though, it isthe population of bats that is getting controlled. This only means that ifnothing is done for them, their numbers will continue to decline. The use of this site is an acceptance of the Dunn Lumber Terms and Conditions. Dunn Lumber and its partners cannot and do not guarantee the accuracy or completeness of the information, materials, or advice on dunndiy.com. Drill the two access holes at the top of each partition. This can be done on a drill press or with a hand-held drill.


No comments:
Post a Comment